The Christmas crafting continues
Christmas took on a new meaning when my daughter was born in October 2015. Aside from rediscovering the magic of Christmas through the overwhelming love poured out for my Eliana, being on maternity leave and having the time available, I decided to do something to commemorate our first Christmas as a family of three. We opted to buy biggish baubles, some ribbon, paint and glitter glue and made personalised Christmas baubles, with El's one bearing the imprint of her tiny foot. When Christmas rolled around again the next year, I just happened to see a post for making an ornament that doubled as a craft and keep sake and so El's hand- and footprints were again used to create something festive. This year when the Christmas spirit started stirring inside, I opted to look for toddler friendly crafts so that my little one could participate a little more actively.
 |
| The results from the first year of this tradition |
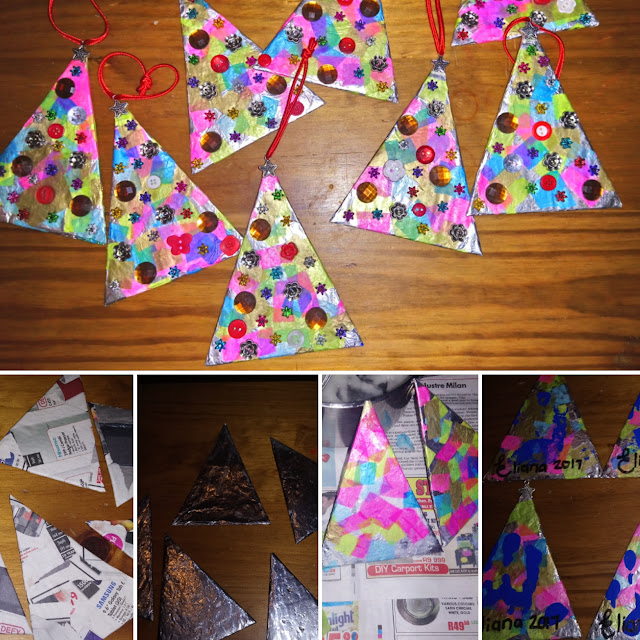
I searched through a few ideas and eventually settled on Tin Foil Christmas Trees via the page Happy Hooligans. I figured that I would just amend the instructions a little bit to make it a little more tiny toddler friendly and also to, hopefully, give the ornaments a little bit more longevity. So instead of going straight from cardboard cutout to tin foil, I added a step to do a layer of papier mâché to try strengthen the cardboard a little bit. This was the first step wherein I invited El to join me. I mixed up the papier mâché paste (1 cup of water, 2 tablespoons of flour - mix together and bring to the boil on the stove top), tore up some newspaper (well, actually it was a pamphlet from Makro), covered the coffee table with newspaper and called my little angel over to "help me". She proceeded to stick her hands into the pot of paste, give it a taste, attempt to grab the pot to play with and then when I tried to show her how to coat the pieces of paper with the paste and stick it to the cardboard, she started to grab the pieces of paper and eat them. She later made it her mission to try pull the newspaper covering the coffee table off... Maybe this would be another mom project...
 |
| Layer of papier mâché dried and ready for tin foil covering |
The next day I did the tin foil covering. I decided to stick the tinfoil down with wood glue, folding the edges over and snipping off excess foil to neatly press down the foil at the back of the tree before cutting more foil to cover the gaps. As stated previously, I like to think that these ornaments with be a little more hardwearing so these steps are purely for that purpose.
 |
| Foil applied |
I deviated from the original instructions again with the tissue paper, opting to use good old papier mâché again. I know Mod Podge is supposedly amazing, but it's also expensive and I figured that non-toxic papier mâché paste is probably better for a 2 year old who likes to sample the crafting materials. Daddy was called in to see if his participation might inspire a little more activity in the toddler... This time she grabbed fistfuls of the tissue paper pieces, wanted to muss them around the surface of the table and, once again, eat them. Daddy did one tree before calling quits and helping by keeping El from consuming too much tissue paper. This step did hold a challenge in that the tissue paper, being somewhat fragile, did occasionally tear upon trying to stick it down. Fortunately there was more than enough to make up for the torn pieces, but it can be frustrating when trying to get a smooth finish only to have the pieces tear, clump together or stick to your fingers as you try to press them down. I fast tracked the drying process and put the trees in the oven on a low heat with the fan on. After monkey had gone to bed, I reheated the remaining paste, added a little more water to it and brought it to the boil, then used a broad paintbrush to do another coat of paste over the trees (both sides were decorated and coated). These were then left overnight to dry.
 |
| Tissue paper added, drying after another coat of paste |
I then decided that I needed to do something that would be specific for El, so I grabbed out some craft paint, poured some into a shallow bowl and got El to do some hand prints. I opted for caution in case she decided to just wondering off while I was trying to do the actual trees, so we first did a few on newspaper before marking the back of each tinfoil tree. Drying time was allowed and then I grabbed a trusty permanent marker to record the year and her name.
 |
| The dark blue craft paint worked well against the pale tissue paper colours |
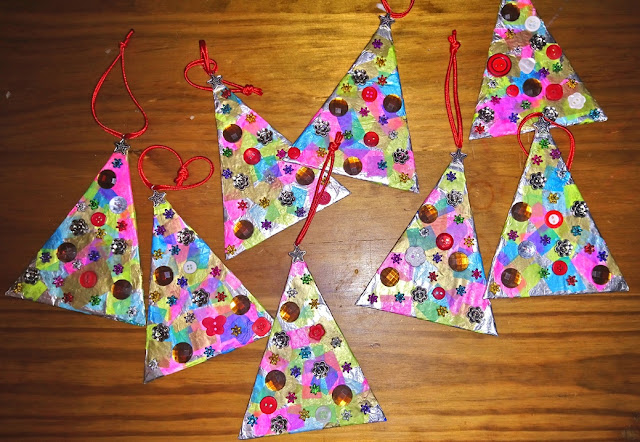
For some bedazzling, I went to JA Floral and picked up some rhinestones, buttons, charms and beads. The star charms were perfect to top the tree since they served as a convenient attachment point for some string to hang the ornament. Some contact adhesive and super glue... Ready to go! Being quite pedantic, gluing these items to the trees was quite a time consuming process, especially since my fingers occasionally got stuck together and needed some drying time to make sure the jewels and trees didn't stick to me or each other in a way they weren't intended to. Decorating my actual Christmas tree is usually a time consuming process due to my POPD... so similarly placing the decorations of these trees required assessment of space, inter-jewel distance, colour and design variation and overall aesthetic appeal.
 |
| Do you also suffer with POPD? |
 |
| All glued down and almost finished! |
Alas, my papier mâché wasn't as hardy as I'd have liked and peeled in a few places so after the trees were mostly finished, I applied a layer of homemade podge to each side of the tree (equal parts cold glue and water, shaken well). Then it was a simple case of threading the star charms and - presto! - another Christmas season, another craft ready to be given as a Christmas keepsake for El's grandparents, godparents and school teachers (and for our own tree)!
 |
| Ready to hang! Not bad for a project made mostly from recyclables! |
I was quite pleased with how the trees turned out, especially since the tissue paper was recycled from previous use in gift bags. I doubt that the end results would have had the same aesthetic appeal had El had some proper active participation, but either way I think this is a nice idea for making your own ornaments and getting your kids in on the festive activities. We'll see what next year holds!


Comments
Post a Comment